Learning about the water cycle is key for kids to understand our planet. It’s a cool process where water moves around the Earth. This includes water on, above, and below the surface.
One great way to teach kids about this is through a fun science activity. You can make a water cycle in a bag. This hands-on kids’ activity shows the water cycle’s stages. It helps kids see and understand it better.
This simple activity helps kids learn about Earth’s processes. It also boosts their scientific skills. It’s a fun way to spark curiosity and learning.
What is the Water Cycle?
The Earth’s water cycle is a complex process. It moves water continuously. This movement is key for life on Earth, as it spreads water around, supporting ecosystems and weather.
The water cycle, also known as the hydrologic cycle, deals with water in three forms: liquid, solid (ice), and gas (water vapor). It’s powered by the sun and involves the atmosphere, oceans, lakes, rivers, and the ground.
The water cycle is essential for life as we know it. It shapes our planet’s climate and weather. It’s a complex system with four main stages.
Evaporation, Condensation, Precipitation, and Collection
Evaporation is the first stage. The sun heats water in rivers, lakes, and oceans, turning it into water vapor. This vapor rises into the atmosphere.
As water vapor rises, it cools down, leading to condensation. During condensation, the water vapor turns back into liquid, forming clouds.
When these clouds get full of water, precipitation happens. Precipitation can be rain, snow, sleet, or hail, depending on the atmosphere.
Lastly, collection occurs. The water falls back to Earth, gathering in rivers, lakes, and oceans, or soaking into the ground, refilling groundwater.
The water cycle never stops, with water always moving between Earth and the atmosphere. Knowing this process helps us manage water and predict the weather.
Materials Needed for Your Experiment
To start a water cycle in a bag, you need the right stuff. This science experiment is easy and fun for kids.
Here’s what you’ll need for this kids’ activity:
- A resealable plastic bag
- Water
- Tape
- A window with sunlight
Each item is key to the experiment. The plastic bag is like a mini-greenhouse, keeping everything inside. Water is vital for showing how the water cycle works. Tape seals any leaks, keeping the bag’s environment steady. And, sunlight on a window makes the cycle happen through evaporation and condensation.

Knowing what each material does helps you understand the science. It also makes sure your science experiment goes well.
Step-by-Step Instructions
Follow these easy steps to set up a water cycle in a bag. You’ll see the magic of evaporation and condensation.
Step 1: Prepare Your Bag
Begin by drawing the water cycle stages on the plastic bag with a marker. Add the sun, clouds, and precipitation to make it clear.
Step 2: Add Water
Fill the bag with a small amount of water. This represents the Earth’s oceans and water bodies in your mini cycle.
Seal the bag tightly and hang it in a sunny window. The sun’s heat will start the evaporation process.
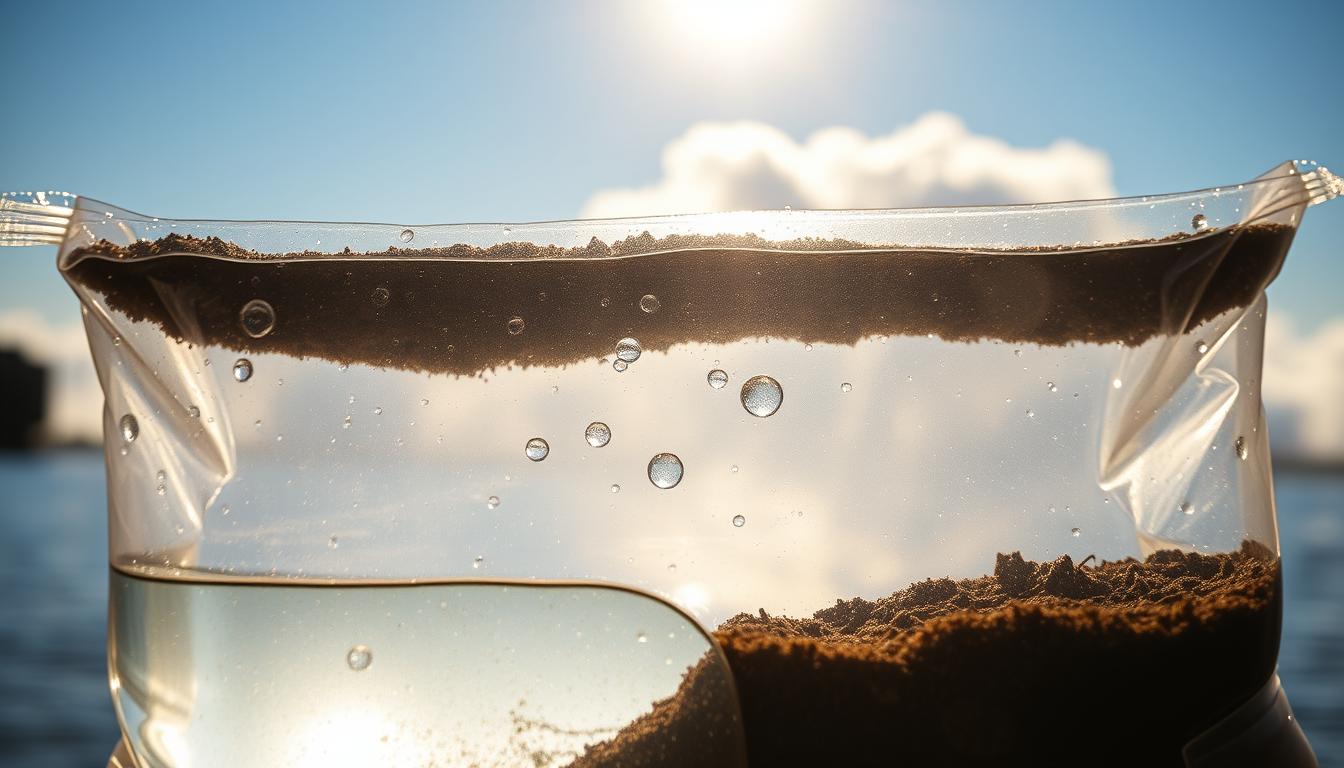
Observing the Cycle
Soon, you’ll see condensation forming inside the bag, like clouds. As it goes on, you might see “precipitation” in the form of droplets falling inside.
Tip: Be patient and watch your mini water cycle for several days. This way, you’ll see the whole cycle in action.
Understanding the Science Behind the Experiment
The science behind the water cycle experiment shows us how our planet’s water moves. It’s a miniature representation of Earth’s water cycle. It shows water moving on, above, and below the Earth’s surface.
The experiment shows three main water cycle steps: evaporation, condensation, and precipitation. First, the sun’s heat makes the water in the bag evaporate. This is like what happens in oceans, lakes, and rivers.
As the water vapor rises, it cools and condenses on the plastic bag’s inner surface. This shows the condensation process.

When the water droplets get too heavy, they fall back into the container. This is like precipitation. This water cycle process is key for life on Earth. The experiment clearly shows these complex processes.
By looking into the science behind this experiment, we learn more about the water cycle. It’s important for our ecosystem.
Observing Your Experiment
Watching your water experiment is key to learning about the water cycle. As it goes on, look for important changes.
First, see the condensation forming inside the bag. This shows the water cycle is happening. Water is evaporating from the “ocean” (the bag’s water) and condensing on the plastic.
Then, look for “precipitation” inside the bag. As condensation grows, droplets will form and fall back into the “ocean”. This mimics real precipitation in the water cycle.
It’s vital to record your observations over time. Note the changes you see. Consider taking photos or drawings to capture your findings.
By observing and recording your results, you’ll understand the water cycle better. You’ll see how it works.
Troubleshooting Common Issues
Troubleshooting is key in any science experiment, like the water cycle in a bag. You might face some common problems. But, these can be fixed easily.
One issue is leakage. If water leaks from the bag, check the seal. Make sure the zip lock or tape is tight. Also, look for any holes in the bag.
Another problem is insufficient evaporation. If not enough water evaporates, check the bag’s location. It should be in a sunny spot. If it’s sunny, just wait longer for evaporation to show.
Lack of condensation is another issue. If condensation doesn’t form, the bag might be too sealed. This stops airflow needed for condensation. Also, check the temperature difference inside and outside the bag.
By fixing these common problems, you can successfully observe the water cycle in your bag. Troubleshooting is a skill that helps in many scientific projects.
Tips for Enhancing the Experiment
Trying different things can really make your water cycle experiment better. One cool thing to do is change how much water you use. Varying the water amount shows how different conditions change the water cycle.
Another exciting variation is to see how different lights affect your experiment. Place your water cycle in a bag under different lights, like direct sunlight, indirect sunlight, or artificial light. This can spark interesting talks about solar energy’s role in the water cycle.
You can also play with other factors, like temperature or the amount of plants in the bag. Experimenting with these variables can give you great insights into how the environment affects the water cycle.
By using these tips, you can make your water cycle experiment more fun and educational. The most important thing is to be creative and curious. Try new things to learn more about the water cycle.
Expanding the Experiment
Now that you’ve seen the water cycle in action, it’s time to think about expanding on this experiment. The initial setup can lead to further questions and inspire a deeper exploration of the processes involved.
One way to expand the experiment is by changing the conditions. For example, you could see how warm versus cool water affects the cycle’s efficiency. You could also look at how different bag sizes change the experiment’s outcome. These changes can give you insights into how different factors affect the water cycle.

As you expand your experiment, make sure to record your observations and results. This will help you spot patterns and draw conclusions. Asking further questions and seeking answers is key in scientific inquiry.
By embracing this spirit of exploration, you’ll not only understand the water cycle better. You’ll also develop important skills in scientific investigation.
Educational Benefits of the Experiment
The water cycle in a bag experiment offers many educational benefits. It boosts learning and curiosity in students. This hands-on activity helps students understand the water cycle and other scientific concepts better.
Students get to practice scientific processes like observation, measurement, and data analysis. They learn to think critically and solve problems as they watch the water cycle change in the bag.
This experiment teaches students about evaporation, condensation, and the role of water in our ecosystem. It’s a rich learning experience that makes the water cycle in a bag a valuable tool in education.
It also helps students appreciate nature more and encourages them to explore more complex scientific topics. This experiment is a great way to introduce students to the wonders of science and spark their interest in future scientific studies.
Safety Considerations
To have a safe and fun learning experience, it’s important to follow a few safety tips. These tips are key when doing the water cycle in a bag experiment.
Be careful with the bag to avoid spills. Make sure it’s tightly sealed before you start. Use non-toxic materials to stay safe.

Do the experiment in a place with good air flow, away from heat or flames. This helps avoid accidents or injuries.
Watch over kids while they do the experiment and teach them about safety. This way, everyone can have a good time and learn something new.
Safety is everyone’s responsibility. Simple precautions help us avoid risks and make learning more rewarding.
Fun Variations on the Experiment
By changing the original experiment, you can learn more about the water cycle. One fun variation is using an incandescent lightbulb instead of sunlight. This works well on cloudy days or where sunlight is scarce.
Another alternative method is to use different types of water, like saltwater or colored water. You can also add a few drops of food coloring to make it more fun to watch.
You can also change the materials in the bag. Try adding different soils or plants to see their effect on the water cycle. These fun variations make the experiment more fun and teach you more about the water cycle.
Don’t be afraid to think outside the box and come up with your own alternative methods. The more you try, the more you’ll learn about this amazing process.
Sharing Your Findings
After you’ve watched and recorded the water cycle in a bag, it’s time to share what you’ve learned. You can do this in class or at science fairs. You can also share online.
Sharing your results helps you remember what you learned. It also helps others learn too. By comparing your findings, you can learn even more about the water cycle.
When you share your results, make sure they are easy to understand. Use diagrams or graphs to help explain your points. This way, others can easily see and appreciate your hard work.