Making a baking soda volcano is a classic science experiment that amazes everyone. It’s a fun way to learn about chemical reactions. Kids and adults love it.
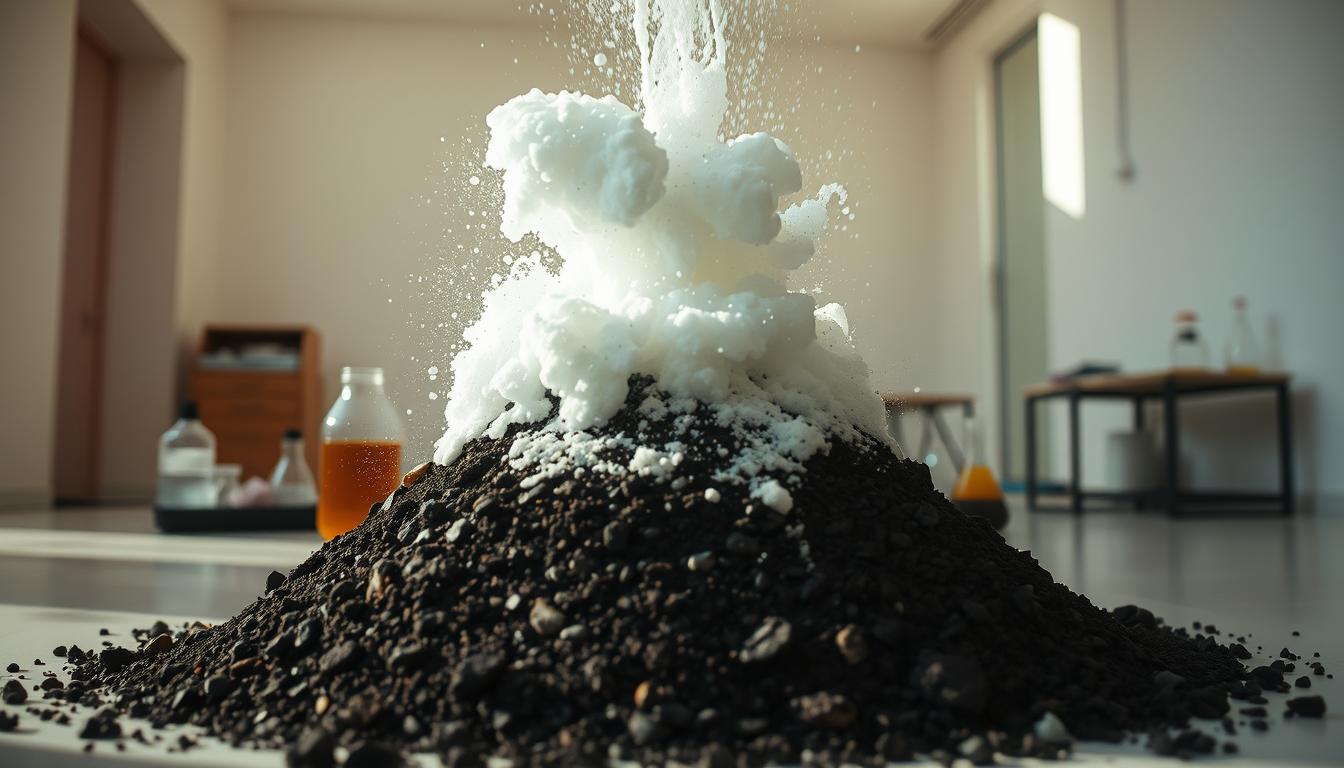
The erupting volcano uses common items like baking soda, vinegar, and a container. Mixing these ingredients creates a fizzing eruption. It looks like a real volcano exploding.
This science experiment is both fun and educational. It’s great for learning in a fun way. You can make your own baking soda volcano at home with a simple guide.
What is a Baking Soda Volcano?
Baking soda volcanoes are fun and educational. They teach us about the science behind volcanic eruptions. They erupt because of a chemical reaction between baking soda and vinegar, just like real volcanoes.
The baking soda volcano is a favorite in schools. It shows how chemical reactions and geological processes work. When baking soda meets vinegar, it creates carbon dioxide gas. This gas builds up pressure and causes the eruption.

This erupting volcano model is both entertaining and educational. It helps people understand chemistry and geology. Watching the eruption teaches us about our planet’s processes.
The reaction between baking soda and vinegar is a chemical one. It releases carbon dioxide gas. The reaction is: NaHCO3 (baking soda) + CH3COOH (vinegar) -> CO2 (carbon dioxide) + H2O (water) + NaAc (sodium acetate). This gas buildup forces the “lava” out, making it look like an eruption.
Essential Supplies for Your Volcano
To make a cool baking soda volcano, you’ll need some essential supplies. The right stuff makes the experiment fun and successful.
The key ingredients are baking soda and vinegar. Baking soda and vinegar mix to create carbon dioxide gas. This gas builds up pressure and causes the eruption. You’ll need lots of both for a great show.
You’ll also need a container for the mixture. A plastic bottle works best. Plus, dish soap helps make the eruption bigger by lowering the liquid’s surface tension. Adding food coloring makes it look even better.

Other DIY volcano supplies include clay or modeling dough. These help shape the volcano and make it look real. With all your materials for volcano experiment ready, you’re ready to start making your volcano.
Step-by-Step Guide to Create Your Volcano
Making a DIY volcano is a fun and educational project. It can be done with just a few simple steps. This guide will show you how to build your own erupting volcano.
First, prepare the volcano’s structure. Mix 2-3 cups of baking soda with a bit of water to make a thick paste. This paste will cause the volcano to erupt. Then, shape the volcano using clay, paper mache, or any modeling material. Make sure to have a small container in the center for the paste.
After your volcano model is ready, it’s time for the eruption. Pour the baking soda paste into the container, then add a bit of vinegar. The reaction between the baking soda and vinegar will make the volcano erupt.
Creating the Eruption
To get a great eruption, use the right baking soda to vinegar ratio. A good starting point is 1-2 tablespoons of baking soda for every 1-2 cups of vinegar. You can tweak this to get the eruption height you want.
When you’re ready, slowly pour the vinegar into the container. Watch as the eruption happens. The chemical reaction creates carbon dioxide gas, making the “lava” flow out of the volcano.
For a successful erupting volcano, use a big enough container and adjust the baking soda and vinegar ratio. Also, have fun trying different things.
By following these steps, you can make your own volcano model that erupts. It will entertain and educate you for hours. So, get creative and start making your DIY volcano today!
Understanding the Science Behind the Eruption
A baking soda volcano eruption is a simple yet fascinating chemical process. It happens when baking soda (sodium bicarbonate) meets vinegar (acetic acid).
When these two mix, they create carbon dioxide gas, water, and salt. This is shown in the equation: NaHCO3 + CH3COOH → CO2 + H2O + NaAc. The key is the carbon dioxide gas.
The Role of Carbon Dioxide
The carbon dioxide gets trapped in the volcano, building pressure. As more CO2 is made, the pressure grows. Eventually, the gas bursts out, causing the eruption.
“The eruption of a volcano is a complex geological process, but the basic principle behind a baking soda volcano is surprisingly similar, involving the buildup and release of pressure.”

The baking soda volcano is a great tool for teaching about chemistry and geology. It shows how a simple reaction can create a big effect. This makes learning fun and encourages more exploration of science.
Creative Variations to Try
Make your baking soda volcano more exciting with these creative variations. Trying new designs and ingredients makes learning fun and engaging.
Change the baking soda or vinegar amounts to see different effects. More baking soda means a bigger eruption. Less means a calmer reaction.

Try new shapes or materials for your volcano. Use clay or paper mache for a unique look. Add glitter, food coloring, or toys for extra fun.
Experiment with different ingredients for a unique eruption. Dish soap makes more foam. Food coloring can color the eruption.
These DIY volcano ideas make learning exciting. They help you understand science, like chemical reactions and geology. By trying new things, you learn more about the eruption.
Safety Precautions During the Experiment
Before starting your volcano experiment, it’s important to know the safety steps. This ensures a safe and fun experience for everyone.
Conducting the Experiment Safely: Always do the baking soda volcano experiment in a well-ventilated area. This prevents fumes from building up during the reaction.
Science teachers stress that safety is a top priority. Knowing the safety rules makes the experience better for everyone.
“The key to a successful science experiment lies not just in its execution but also in the safety measures taken during its conduct.”
Important safety precautions include avoiding eye contact with the eruption mixture. Also, make sure the experiment area is stable and flat. Wearing goggles or glasses is a good idea to protect your eyes.
By following these safety precautions, your volcano experiment will be both fun and safe. Remember, science experiment safety is key to a great experience.
Ideal Age Group for the Volcano Experiment
Choosing the right age for the volcano experiment is key. It’s about learning and staying safe.
The baking soda volcano experiment is a hit with kids. It teaches them about chemistry and geology in a fun way.
For kids aged 5-7, it’s a great science starter. They need lots of help from adults. It’s all about sparking their curiosity.
When kids are 8-12, they grasp more complex science. They can help more with the experiment. But, they should also have adult guidance.
Teenagers can dive deeper into the science. They learn about chemical reactions and geology. They might need less supervision, depending on their maturity.
In short, the volcano experiment is fun for all ages. With the right help, kids of all ages can enjoy it. It’s a great way to make learning fun through kids science experiments and educational activities.
Encouraging Learning Through Experimentation
The baking soda volcano experiment is a fun way to learn about science. It’s not just fun; it teaches about chemical reactions and how the Earth works. This hands-on activity is great for learning.
The baking soda volcano experiment is key in science education. It shows how chemical reactions work in a real way. When you mix baking soda and vinegar, it looks like a volcano erupting. This shows how gases can build up and then burst out.
This experiment helps students learn by doing. It makes them curious and want to learn more. By doing experiments, students get to see science in action and understand it better.
Adding experiments like the baking soda volcano to school makes learning fun. It makes science more interesting and hands-on. It’s a great way to show how science works in real life.
Sharing Your Volcano Experiment Results
Now that you’ve made your baking soda volcano, it’s time to share it with others. Documenting your experiment is fun and educational. It lets you reflect on your process and share your findings with friends and family.
Take photos or videos of your volcano’s eruption. Share them on social media or with classmates. You can also show it off at home or in a science fair. This encourages others to learn from your experiment.
Sharing science experiments like this one is great for learning together. It builds a sense of community and inspires others to explore science. By sharing your results, you can encourage others to make their own baking soda volcano. This fosters a love of learning and experimentation.